Before you start adding the fletches to your shafts, you need to "finish" your arrow shafts. You want them to be smooth, strait and if possible use a finish so they are protects from the elements and moist dirt.
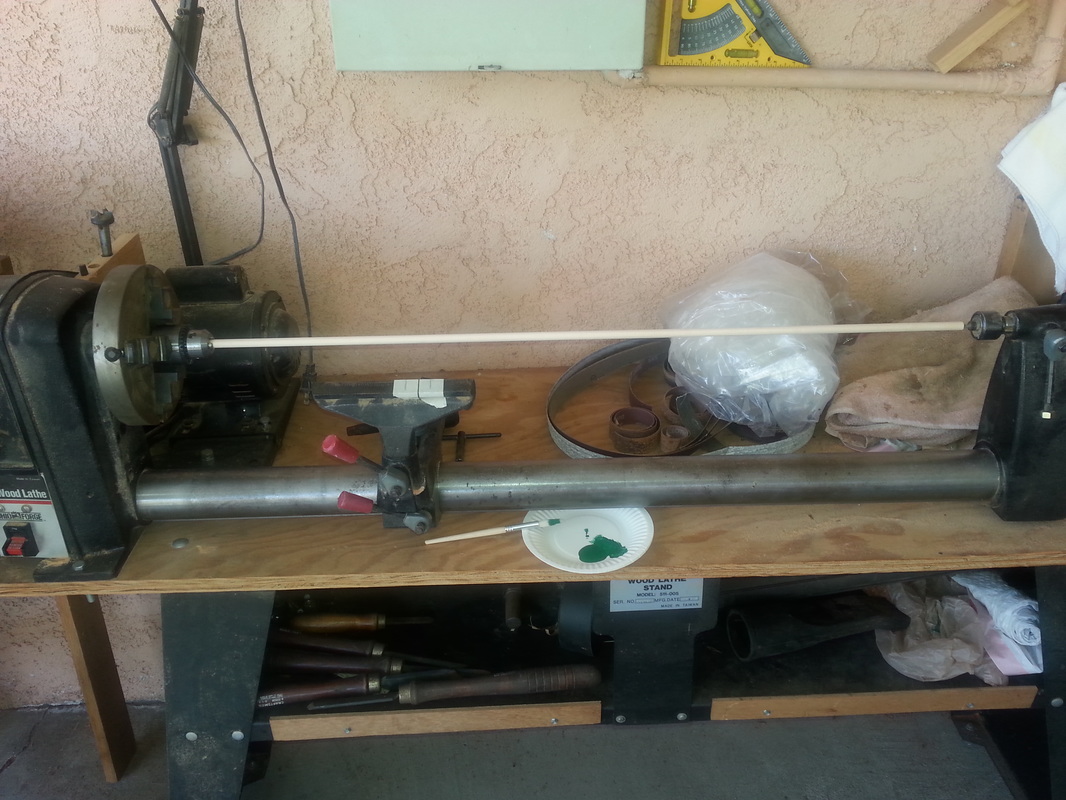
It turned out my Dad, is awesome. He has had a wood working hobby for most of my life. So he has a lot of tools in his garage and backyard. When I expressed interest in learning to make my own arrows he stepped right up to help. He has a full sized Lathe, and just about every other wood working tool you can imagine.
The tools I used are decidedly NOT medieval. I used the powered Lathe for almost every step of finishing my 12 arrow shafts. Also Q-tips, paper towels and old hand rag towels.
The images below are step by step of my process. This was my first time ever making arrows, so please do not judge imperfection too harshly. The shafts are Sitka spruce 32inch, 11/32 diameter and made to handle 40-44 pound bows.
Step one: Sanding them smooth.
Before you begin staining or painting your shafts, you need to sand the worst of the burs and bits off. Some folks use 150grit, followed by 220. I used 150 grit, and then my dad gave me a sanding sponge that is meant for smoothing wood pens and decorative items. I think it was more than 220 grit. A sponge sander bends and curves around the shafts so you get a faster smooth finish.
Keep in mind that you will briefly sand them again at some point during the final stages of stain and finishing. Thus perfection is not necessary in the first stage. Just get the obvious stuff off.
The fantastic tool of spinning awesomeness!!
A Lathe.
A Lathe.
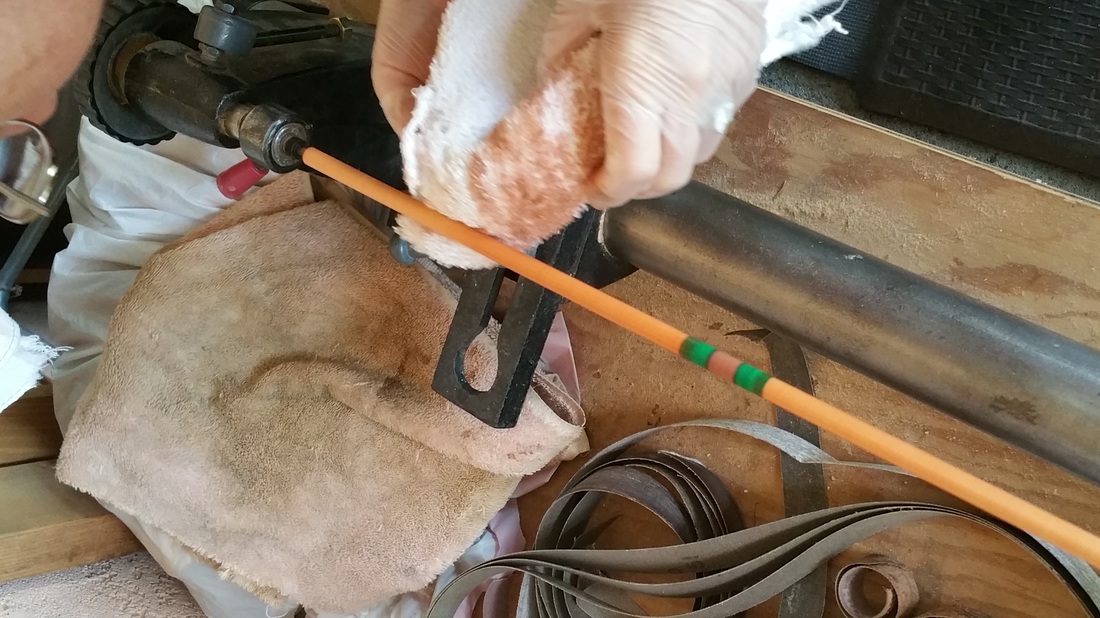
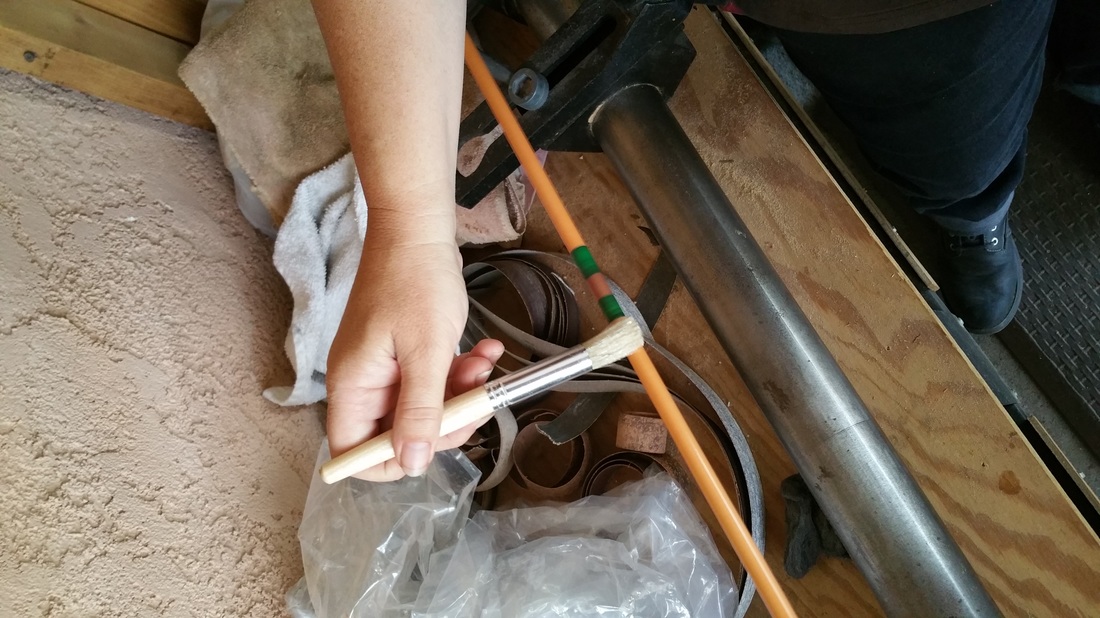
Step 2: Wrapping, banding or painting your shafts.
Do this step before staining your shafts. Once the wood is stained it may not take the paint as well. I also do not suggest inexpensive markers as they tend to bleed into the surrounding wood. If you use markers, use high quality thick ones that will not bleed or leech out of your pattern. Acrylic paint is best, and comes in lots of colors.
Do this step before staining your shafts. Once the wood is stained it may not take the paint as well. I also do not suggest inexpensive markers as they tend to bleed into the surrounding wood. If you use markers, use high quality thick ones that will not bleed or leech out of your pattern. Acrylic paint is best, and comes in lots of colors.
| Some people like to paint or "band" their arrows. People add bands to their arrows so that it is easier to identify them on a busy range. In the SCA we band them in our colors, or perhaps in Barony or Kingdom colors. I used a "Christmas green" acrylic paint from the local craft store. |  |
For the first 3 or 4 arrows I used a paint brush. But after I switched to the Q-tips I had much more precise lines and control. You can actually tell if you look, the ones I used a paint brush on have much thicker green bands. I am going to have Gold and Blue fletch, so I used green for the arrow banding. My colors, if my device goes through, will be green blue and gold.
Next time I do this, I will do the paint bands all at once. I did not decide to do a darker stain color between the green until after I finished the first step on this set. So if you do this, decide what you want the banding to look like and do all of the steps for each shaft as you go. It will save time and in the long run I think give a more uniform appearance.
Next time I do this, I will do the paint bands all at once. I did not decide to do a darker stain color between the green until after I finished the first step on this set. So if you do this, decide what you want the banding to look like and do all of the steps for each shaft as you go. It will save time and in the long run I think give a more uniform appearance.


Step 3: Full shaft staining.
For this stage I chose a "golden oak" stain. My dad had at least 12 stains to choose from. I wanted a slightly honey colored golden yellow. This worked well for my shafts since they are such a light color wood. Test your stain on a similar wood, or a small spot of your shafts (like a piece you cut off perhaps?)
Safety note: Please use gloves and do this outdoors or in a well ventilated area. Stain and the finishing coat are strong. Even outside I felt a bit giddy by the time I finished this phase.
The longer you leave a stain on the wood, the deeper the color. Also realize that it takes very little stain to accomplish your goal. So if you want a light stain, apply it, wait a few seconds and wipe off with a towel. For a deeper color, wait a minute or so. Again, the lathe is my friend. I used a piece of cut towel dipped in the stain. Turned the lathe on and just slid the towel across the whole thing. Then let the wiper towel do it's job and boom. Done!
Step 4: Finish coats.
The finishing coat is a clear layer that adds shine, and protects the wood. The finish my dad gave me to use is the same one he uses for his home made wooden pens and spice grinders. Its makes wood so shiny and pretty! It tends to deepen the color a bit too.
NOTE!! You need to apply the finish and smoothly and quickly as possible. So be sure that once you place the arrow in the lathe, you wipe it off to be sure there is no fluff or dust. This is where the lathe really shines. I just set the paint brush full of finish on one end and let it slide up as the arrow spun.
You can do 2 or 3 layers of finish. After the first layer drys you want to gently re-sand your wood again. This is due to the wood flexing and expanding with the moisture from the paints and stains you applied. There will be a slightly rough feel to the wood, and you want it smooth, so you need this final buffing. I used Steel Wool (in 0000 or 4 aught) to do the final smoothing. It worked great and only need a quick once over. Be sure to dust off the shaft before applying the next coat of finish.
| These are the finished shafts for my arrows. Golden oak stain with clear finish, Christmas green acrylic paint with mohogany stain between the green banding. The bottom tips are where the arrow points will be going. So I used them for easy handling and did not stain or finish them. | 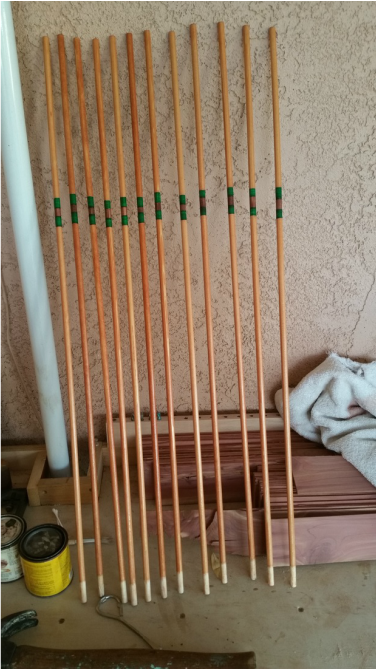 |
So, there you have it! Finished shafts ready for nocks, tips, and fletching. Next week I will be adding all that to these to complete my first set of arrows! I am so excited!


 RSS Feed
